So last week I showed you all the massively cute jeans I made for my girls. Well today I am going to show you the top!
Sorry to tell you though it isn't a tutorial. Remember the Easter dresses I made my girls this year? Well this shirt came in the pattern as well.
I did make some of the same adjustments as I did for the dress as well. I made the neck line higher and I made my own bias tape (once you start making bias tape you will never go back!) But on this shirt I wanted the ruffle to be more ruffled than it was on the dresses. I was happy with the look but it caused one problem: The ruffle that got wrapped under made a big poof. So I found the spots where a ruffle naturally ends/begins and I tacked those spots down. I used my sewing machine to tack down instead of doing it by hand because I am lazy like that.
All you do is turn the feed dog on you machine off. This way you material will stay in one spot under the needle. Then I set my needle to do a slight zig zag. And voila that spot is down for good.
This wrap dress/top pattern is one of the best patterns I have ever bought. Totally worth it!
So a super cute shirt plus super cute jeans= one amazingly cute first grader on her first day of school.
Best part is: For both my girls back to school outfits I spent $12! Not $12 per outfit but $12 total!!! You really can't beat that.
Now to wait a week to send the pre-schooler off and maybe some sanity will begin to return....
Showing posts with label Cute Crafts. Show all posts
Tuesday, August 23, 2011
Tuesday, August 16, 2011
Girls Jeans with Ribbons and Ruffles
The first day of school is quickly approaching. I like my girls to have a special first day of school outfit. When my eldest was in preschool it was easy to find her something way cute for a good price. But she grew up a little and went to kindergarten and moved into the big girl section of clothes. I discovered something. For the most part I HATE the big girl section of clothes. (Is is just me?) My 6 yr old is still a little girl but they want her to dress like a 14 yr old slut. Sorry I am just not into that. So last year finding a first day of school outfit was very very difficult and I only settled with what she got.
Not bad but I didn't love it. So this year I am planning ahead of time and I have made her and her sister the cutest little outfits. Today I am going to show you the jeans.
I LOVE them. So if you want to make some too here's how you do it.
Start off by finding an old pair of jeans that still fit in the waist but not in the length. Cut off the bottom of the jeans about 3 inches above where you want the bottom of your ruffle to hit. I wanted capri length instead of pant length because it is still so warm outside.
Now decide how many ribbons you want to add and lay them out and play with them. See how many inches up the top of your top ribbon will be. Now unpick that much plus a little extra for wiggle room.
Now get a length of ribbon to fit around your pant leg and pin it on. Measuring of course to make sure it is even.
Featured on:
Not bad but I didn't love it. So this year I am planning ahead of time and I have made her and her sister the cutest little outfits. Today I am going to show you the jeans.
I LOVE them. So if you want to make some too here's how you do it.
Start off by finding an old pair of jeans that still fit in the waist but not in the length. Cut off the bottom of the jeans about 3 inches above where you want the bottom of your ruffle to hit. I wanted capri length instead of pant length because it is still so warm outside.
Now decide how many ribbons you want to add and lay them out and play with them. See how many inches up the top of your top ribbon will be. Now unpick that much plus a little extra for wiggle room.
Now get a length of ribbon to fit around your pant leg and pin it on. Measuring of course to make sure it is even.
Now sew your ribbon on. Make sure that you sew to the ends of the seems and don't sew the seems flat.
Now repeat with your remaining ribbon.
Now close those seems back up. Sew down the line that is left from the original seem and then sew a zig zag down the edge. (Sorry the purple thread I used doesn't really show up well.)
Now that part is all done and you can add a darling ruffle. Now I was researching how others added their ruffles and I ran across the most perfect tutorial at From An Igloo. it is so perfect I am going to send you over there. Her tutorial makes the ruffle not only way cute but also a very good quality. The only change I made was preference. I wanted my ruffle a bit fuller so I tripled my measurement of the circumference of the bottom of the jeans. My younger daughter's jean leg circumference was 10 inches so I cut my strip 30 inches long. I thought it was perfect.
I am so happy with they way these jeans turned out.
I hope you like them as much as I do.
Next week I will show you the shirt I made to go with them. You should be excited.
Featured on:
Linked up to the following:

Thursday, June 30, 2011
One Last Baby Shower Post
Okay here is the last post of what we did for this past baby shower. You know after doing three baby showers this year and not having another one to do I think I might go crazy:) Any one want me to throw them a baby shower???
One more thing to show you. My mom made a diaper cake and she did a pretty good job too.
I just love the bright summer colors!!! And I love that I didn't make it:)
Anyways here is the last thing I did. I got the idea from Sarah Ortega.
Onesie Cupcakes and how cute are they? They were simple to make, once I got the hang of them. Sarah suggests using your hand to make the cupcake top, then roll the receiving blanket with the onesie in it. That method for some reason did not work for me. So I rolled the blanket but I used two fingers in the middle to insure I had space, than I placed the onesie over the blanket and made the shape I wanted.
Also be sure to buy the larger coffee filters for the wrappers. Otherwise you will end of with over 1000 coffee filters and you don't drink coffee...
Here's a view from the top.
Oh I love them. And they were on a pretty white cake stand too.One more thing to show you. My mom made a diaper cake and she did a pretty good job too.
I just love the bright summer colors!!! And I love that I didn't make it:)
I hope you are having a great summer!
Thursday, June 23, 2011
Paper Garland
So I have a new favorite Party Decoration. Stacked paper garland. It is so cute, fast and easy to make and really inexpensive. I got the idea from Kojo Designs. You can read her tutorial on it there too. I made it for the baby shower I did last week but trust me I will be using this idea over and over again. Here is how mine turned out.
I tied a balloon to the bottom because I didn't use card stock for all my pieces so they were kinda curling a little bit. I think next time I will glue two pieces of my non card stock together so it has a front and back and a little more weight.
But over all I would say this project was perfectly imperfect. And that is how I like to do things. The solid card stock I used was 8X11 paper and the colored pattern paper was 12X12. So I cut a variety of strips that were 12 inch long, 8 inches long and 11 inches long. I cute them any where between 1-2 inches thick and I think the variety was just perfect. I LOVED how they turned out. I made 6 and hung them around the room. All 6 took be between 30-45 min from start to finish. How awesome is that.
So they next party you throw and you need and cute, inexpensive and fast decoration these come HIGHLY recommended by me.
Enjoy!
I tied a balloon to the bottom because I didn't use card stock for all my pieces so they were kinda curling a little bit. I think next time I will glue two pieces of my non card stock together so it has a front and back and a little more weight.
But over all I would say this project was perfectly imperfect. And that is how I like to do things. The solid card stock I used was 8X11 paper and the colored pattern paper was 12X12. So I cut a variety of strips that were 12 inch long, 8 inches long and 11 inches long. I cute them any where between 1-2 inches thick and I think the variety was just perfect. I LOVED how they turned out. I made 6 and hung them around the room. All 6 took be between 30-45 min from start to finish. How awesome is that.
So they next party you throw and you need and cute, inexpensive and fast decoration these come HIGHLY recommended by me.
Enjoy!
Thursday, June 9, 2011
Baby Shower Invite
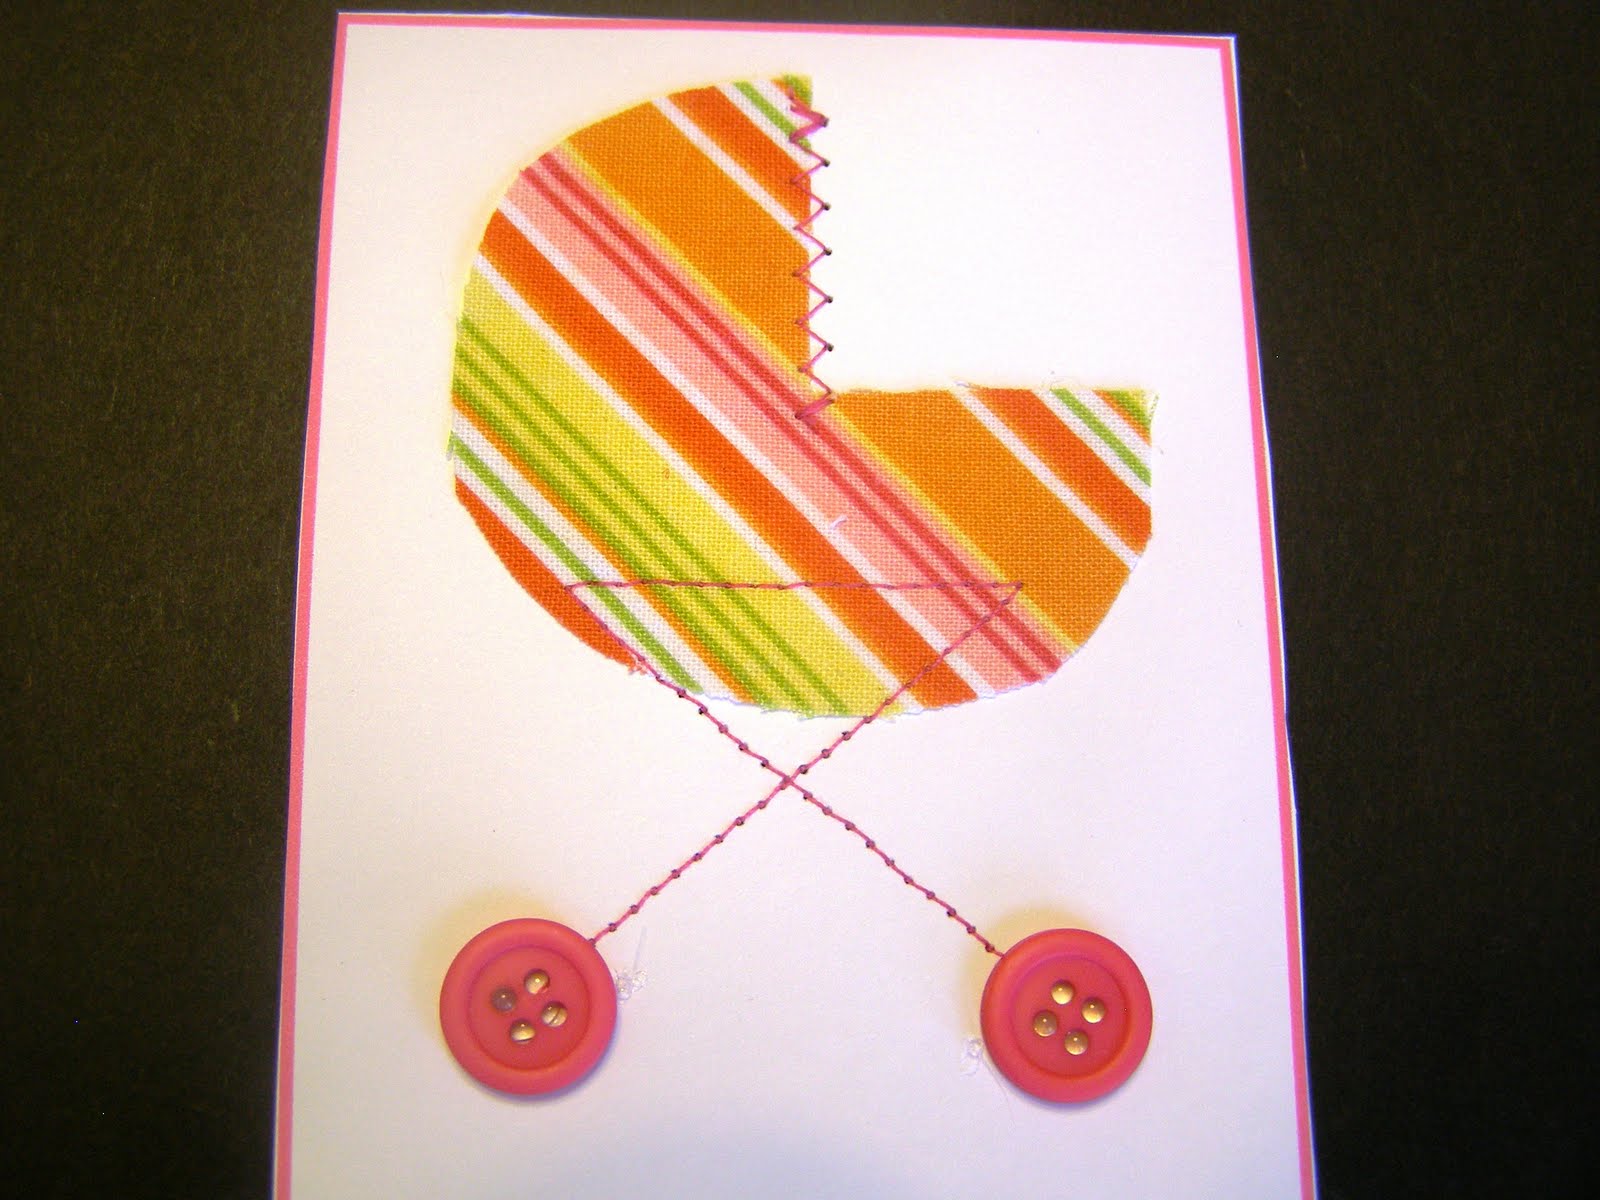
So I am currently working on my 3rd baby shower for this year. I am working with my mom and sister and we are keeping it simple. I am in charge of the invitations and when I saw this idea from Anna Maria Horner and here I had to do it. Plus I already had everything I needed on hand.
So here is how they turned out.
Sooo cute! And so easy. I just cut a oval shape and cut 1 corner out for my template. Then I cut out all my fabric and I used fabric glue to glue them onto the invites (that is what I had on hand, I ready someone else who used glue dots which would work too.) Then I sewed them on and used hot glue for the button wheels. So easy and so cute.
So here is how they turned out.
Sooo cute! And so easy. I just cut a oval shape and cut 1 corner out for my template. Then I cut out all my fabric and I used fabric glue to glue them onto the invites (that is what I had on hand, I ready someone else who used glue dots which would work too.) Then I sewed them on and used hot glue for the button wheels. So easy and so cute.
Tuesday, May 10, 2011
Hooded Baby Towel
When I had my third baby a friend gave me a homemade hooded baby towel and I loved it! It was unlike any other design I have seen for a hood but I liked it sooo much better. So when my sister just had her 3rd baby I decided I wanted to give her a hooded towel as well. So I went searching for tutorials and I couldn't find any that were like the one I received. So I just had to study the hood and figure it out on my own. I also made a cute little wash cloth to go with it. And it turned out super cute.
So here is what you are going to need.
A towel
Washcloth
1/4 yrd flannel
ribbon or other trims you want to use
basic sewing supplies
(If you want a wash cloth as well you need 1/4 yr terry cloth)
Now the first thing you are going to do is add your trim. You will want to do this on the "wrong" side of your wash cloth at what you want to be your top.
Now this is the tricky part and since I was tryi9ng to figure it out myself I don't have great pics so feel free to let me know if you have any questions.
Turn your wash cloth so you can see the front. Turn the top down about 1-1 1/2 inches. Now fold the wash cloth down again stopping about 1 1/2-2 inches from the bottom. Now it will look like this.
You see the black line I drew in, that is where you are going to sew. I zig-zagged it for more security. You want to start at about 2 inches from the side and go down to the corner. Do that on both sides and trim off the triangles.
Now flip it right side out.
Cute little hood isn't it. I wanted to add a little extra so I cut a duck out of my flannel and ironed it on with heat bond. Then appliqued it on.
Now you're going to attach this to the towel. You want to attach it to the center of the long side. I just overlapped the binding on the cloth and the towel and went around twice for extra security again.
Sorry I know it is hard to see I picked a good matching thread.
And Voila you have a cute towel. (bad picture but cute towel)
Now for the wash cloth. First please pre-wash your fabrics, or else the first time they are washed together you will likely end up with something that no longer matches.
Take your 1/4 yd flannel and fold a triangle to make a square. Now cut it out.
Then lay your flannel on your terry cloth and cut out a matching square. Put right sides together. Draw curved corners on all 4 corners. I used an old washcloth as a guide.
Sew the two together leaving about a 3 inch gap in one side. Now turn it right side out and top stitch around the washcloth.
Now you have a cute wash clothe to match your cute towel. A perfect gift for a baby.
I am glad to know there is one less baby wrapped you in a thin store bought hooded towel tonight. Instead he is warm and snugglie in a soft thick towel made with love.
So here is what you are going to need.
A towel
Washcloth
1/4 yrd flannel
ribbon or other trims you want to use
basic sewing supplies
(If you want a wash cloth as well you need 1/4 yr terry cloth)
Now the first thing you are going to do is add your trim. You will want to do this on the "wrong" side of your wash cloth at what you want to be your top.
Now this is the tricky part and since I was tryi9ng to figure it out myself I don't have great pics so feel free to let me know if you have any questions.
Turn your wash cloth so you can see the front. Turn the top down about 1-1 1/2 inches. Now fold the wash cloth down again stopping about 1 1/2-2 inches from the bottom. Now it will look like this.
You see the black line I drew in, that is where you are going to sew. I zig-zagged it for more security. You want to start at about 2 inches from the side and go down to the corner. Do that on both sides and trim off the triangles.
Now flip it right side out.
Cute little hood isn't it. I wanted to add a little extra so I cut a duck out of my flannel and ironed it on with heat bond. Then appliqued it on.
Now you're going to attach this to the towel. You want to attach it to the center of the long side. I just overlapped the binding on the cloth and the towel and went around twice for extra security again.
Sorry I know it is hard to see I picked a good matching thread.
And Voila you have a cute towel. (bad picture but cute towel)
Now for the wash cloth. First please pre-wash your fabrics, or else the first time they are washed together you will likely end up with something that no longer matches.
Take your 1/4 yd flannel and fold a triangle to make a square. Now cut it out.
Then lay your flannel on your terry cloth and cut out a matching square. Put right sides together. Draw curved corners on all 4 corners. I used an old washcloth as a guide.
Sew the two together leaving about a 3 inch gap in one side. Now turn it right side out and top stitch around the washcloth.
Now you have a cute wash clothe to match your cute towel. A perfect gift for a baby.
I am glad to know there is one less baby wrapped you in a thin store bought hooded towel tonight. Instead he is warm and snugglie in a soft thick towel made with love.
Wednesday, March 23, 2011
Tutorial Review {Reversible Purse}
Can you believe it I am doing a review. It's been a little while. Anyways I needed to make a little gift to give to a few wonderful women I know. I wanted it to be simple and cute. So after some searching I decided to make this bag from Martha Stewart. It is really super simple and a beginners project. But me like the brilliant person I am sometimes didn't fully read the instructions and I messed up. So I will save you from my same fate. So here we gooooo.
So you can find the pattern to print out and the instruction here.
But let me restate what they say in the instructions so you don't mess up like I did. When you sew your pieces together you sew the top seems and then the bag part leaving the arms (both sides) open. Like this.
Also let me point out because it doesn't say this in the instructions but you need to clip your curves...
...and iron open your seems. (Mostly the top of the arms.)
When you put your two pieces together again you are only sewing the inside (think of it like a bib and you are sewing the neck line.) Leave the outside of the arms open still. And remember to clip those curves as well.
Keep on following the instructions and you will have this cute little reversible handbag.
It only takes about 45 min to sew and you only need 1 total yard of fabric. So quick, easy, inexpensive and super cute and handy. My type of gift.
So you can find the pattern to print out and the instruction here.
But let me restate what they say in the instructions so you don't mess up like I did. When you sew your pieces together you sew the top seems and then the bag part leaving the arms (both sides) open. Like this.
Also let me point out because it doesn't say this in the instructions but you need to clip your curves...
...and iron open your seems. (Mostly the top of the arms.)
When you put your two pieces together again you are only sewing the inside (think of it like a bib and you are sewing the neck line.) Leave the outside of the arms open still. And remember to clip those curves as well.
Keep on following the instructions and you will have this cute little reversible handbag.
It only takes about 45 min to sew and you only need 1 total yard of fabric. So quick, easy, inexpensive and super cute and handy. My type of gift.
Monday, March 14, 2011
St. Patty's Day Wreath
I do not have a single piece of St. Patrick's Day decor in my home. So this year I decided I needed to at least do a wreath. And I got a brilliant idea, but then I couldn't find what I needed so I gave up. Then a few days ago I got another idea and this one was easy to get everything I needed and I love it. So now less than a week before St. Patrick's day I finally have a wreath.
So here's what you need to make this wreath:
A wreath you can wrap and stick pins into. (I used the same wreath I used in this project.)
1/8 yd of 4 pieces of green fabric
1 yd heavy iron on interfacing (or wonder under)
freezer paper
white ball headed pins
9ish yards of 3 inch ribbon to wrap the wreath with
1 yr ribbon for bow.
Now what to do. ( I am sorry I don't have step by step photo's but it is fairly simple.)
First wrap you wreath with your ribbon.
Now make your shamrocks. To do this I found a 3 leaf clip art and a 4 leaf clip art clover and printed them off in 2 different sizes. My large was slightly bigger than 3 inches and my small was about 1 1/2 inches.
Trace an assortment of your shamrocks onto freezer paper. You will need about 15 from each piece of fabric. Trace onto a size that will fit your fabric
Iron your interfacing onto the wrong side of your fabric and then iron your freezer paper to the right side of your fabric. Then cut all of them out.
Now just piece a large one and a small one together and stick one of you white pins through them into the wreath.
Fill up your wreath.
Now for the finishing touch, a bow.
I just looped the bow around until I had 6 large loops. I didn't tie it or sew it or anything fancy like that. I simple grabbed a shamrock pair and stuck it in the middle to finish it off and hold it together.
And the wreath is done. Simple and cute. And it cost me less then $10.

So here's what you need to make this wreath:
A wreath you can wrap and stick pins into. (I used the same wreath I used in this project.)
1/8 yd of 4 pieces of green fabric
1 yd heavy iron on interfacing (or wonder under)
freezer paper
white ball headed pins
9ish yards of 3 inch ribbon to wrap the wreath with
1 yr ribbon for bow.
Now what to do. ( I am sorry I don't have step by step photo's but it is fairly simple.)
First wrap you wreath with your ribbon.
Now make your shamrocks. To do this I found a 3 leaf clip art and a 4 leaf clip art clover and printed them off in 2 different sizes. My large was slightly bigger than 3 inches and my small was about 1 1/2 inches.
Trace an assortment of your shamrocks onto freezer paper. You will need about 15 from each piece of fabric. Trace onto a size that will fit your fabric
Iron your interfacing onto the wrong side of your fabric and then iron your freezer paper to the right side of your fabric. Then cut all of them out.
Now just piece a large one and a small one together and stick one of you white pins through them into the wreath.
Fill up your wreath.
Now for the finishing touch, a bow.
I just looped the bow around until I had 6 large loops. I didn't tie it or sew it or anything fancy like that. I simple grabbed a shamrock pair and stuck it in the middle to finish it off and hold it together.
And the wreath is done. Simple and cute. And it cost me less then $10.

Labels:
Cute Crafts,
Holiday/Birthday,
home decor
Thursday, February 17, 2011
Fairy Wings
So I have made fairy wings in the past using knee high nylons and hangers, and while I liked them, I didn't like them. (here is my old post about fairy wings.) So with my eldest daughter having a fairy birthday it was time to make some new wings. This time I bought galvanized wire from wal-mart and cellophane paper (I saw this idea somewhere but again I cannot find where so if you have seen it let me know please!) And I think they turned out pretty darn cute.
So here is what you are going to need. Galvanized wire (the whole spool is like $3), wire cutters duct tape, cellophane paper and not pictured hot glue gun.
And for decorations, lots of glitter and again not pictured ribbon. (Sorry I have just finished 2 of the busiest months of my life and my sanity did not survive. Hopefully it will come back soon.)
First let me apologize for the close up pictures of my gnarly carpet, I have dreamed of new carpet from the day we moved in, but alas it is still a dream. Now on to the tutorial. First I cut two equal lengths of wire. I would guesstimate that I cut around 2 feet. Then I shaped the wire into fairy wings shapes. If you wish you can cut two more equal pieces of wire and shape them as well for the bottom, but I was running short on time and that got left out on these ones. Duct tape all your piece together in the same spot around the ends of you wires.
Now cut out a piece of cellophane paper slightly larger than one of your wings. Now piece by piece hot glue it onto your wire,
Repeat with all your wings and trim the excess paper. Now lay your wings on some newspaper and get your spray glitter and go to town. I did about 7 coats.
Now get a cute flower or something you like to put in the middle to cover up your duct tape. Glue that down.
Then attach ribbons about "shoulder" width apart with hot glue. Make sure your ribbon is long enough to tie around the arms into cute bows in the front. And add any other decorations you would like. I kinda wish I had some marabou to glue around the edges but it was late and the birthday was the next day so really fast and simple was my goal.
Now if you are doing a 4 winged fairy instead of a two wing fairy I have a tip for you on how to attach all the wings together. But since I didn't make some I have to do a "paint" drawing. So please promise not to laugh at my artistic abilities.
So as you saw in my two wings I just taped them together in the middle but if we were adding two bottom wings that would be near impossible to add them to that spot as well. So what you are going to want to do is finish off you wire out from the wing. So you have a line between all the wings. The red line in the drawing bellow is that wire. This way you can attach all your wings to the same spot. You will need more tape to sturdy it up and a larger center piece to cover it up, but they will still be simple cute.
Okay please stop laughing at my drawing now. Thank you. As always if you have any questions feel free to let me know.
So here is what you are going to need. Galvanized wire (the whole spool is like $3), wire cutters duct tape, cellophane paper and not pictured hot glue gun.
And for decorations, lots of glitter and again not pictured ribbon. (Sorry I have just finished 2 of the busiest months of my life and my sanity did not survive. Hopefully it will come back soon.)
First let me apologize for the close up pictures of my gnarly carpet, I have dreamed of new carpet from the day we moved in, but alas it is still a dream. Now on to the tutorial. First I cut two equal lengths of wire. I would guesstimate that I cut around 2 feet. Then I shaped the wire into fairy wings shapes. If you wish you can cut two more equal pieces of wire and shape them as well for the bottom, but I was running short on time and that got left out on these ones. Duct tape all your piece together in the same spot around the ends of you wires.
Now cut out a piece of cellophane paper slightly larger than one of your wings. Now piece by piece hot glue it onto your wire,
Repeat with all your wings and trim the excess paper. Now lay your wings on some newspaper and get your spray glitter and go to town. I did about 7 coats.
Now get a cute flower or something you like to put in the middle to cover up your duct tape. Glue that down.
Then attach ribbons about "shoulder" width apart with hot glue. Make sure your ribbon is long enough to tie around the arms into cute bows in the front. And add any other decorations you would like. I kinda wish I had some marabou to glue around the edges but it was late and the birthday was the next day so really fast and simple was my goal.
Now if you are doing a 4 winged fairy instead of a two wing fairy I have a tip for you on how to attach all the wings together. But since I didn't make some I have to do a "paint" drawing. So please promise not to laugh at my artistic abilities.
So as you saw in my two wings I just taped them together in the middle but if we were adding two bottom wings that would be near impossible to add them to that spot as well. So what you are going to want to do is finish off you wire out from the wing. So you have a line between all the wings. The red line in the drawing bellow is that wire. This way you can attach all your wings to the same spot. You will need more tape to sturdy it up and a larger center piece to cover it up, but they will still be simple cute.
Okay please stop laughing at my drawing now. Thank you. As always if you have any questions feel free to let me know.
Subscribe to:
Posts (Atom)