Tuesday, June 29, 2010

Tutorial Review {4th of July Wreath}

Sorry I am a day late, but... well... you know... life happens. And I do have a small case of crazy brain.  First off did you read the last post with the cute castle reward chart?  That was my wonderful sister who has tons of fun creative ideas so don't be surprised to see her around here from time to time.
Now for our review.  Today's craft comes from a fairly new blog called Multi Cultural Crafts.  Nelda started blogging just this May.  She has done some really cute things already and I am excited to see what else she comes up with.  She has done some super cute graduation crafts.

And a cute way to spruce up your bathroom wash cloths.
But today we are going to make her 4th of July wreath.
I think it's super cute.  The 4th of July is one of the best holidays out there if you ask me.  I love it!  I also love wreaths, but combining the two has been something of a challenge for me until I saw this.  Here is my finished product.
Isn't that fun!
Okay now for some tips.
First the tighter you make your ruffles the more fabric you will need, I made mine a bit looser then as I put them on the wreath I pushed the ruffles to the front, so my back looks really blah, but the front is cute and ruffled. The top ruffle is gathered too tight the bottom ruffle is just right in my opinion.
Also I found this wreath at my local thrift store for $1.50 and decided to use it.  I ended up loving it because I could pin the ruffles to the wreath.  This way I can unpin and fix them or I can unpin them with each season and make a new wreath.
So I started wrapping my wreath and a little ways into it I said out loud, "I am so not loving you."  I then sat down and ate a large piece of caramel filled chocolate and thought about it.
See, not right is it?  I ended up undoing it and then when I wrapped again I made my wraps further apart.  It was one of those subtle night and day differences.
I also kinda need to re-do part of the wreath but I really don't want to go to the store again.  You see I bought the material at my local Wally World (it's about the only store in town).  I ended up not having enough so I had to go back.  You know Wally World does not have the biggest selection of fabric so I wasn't too concerned about matching exactly.  I got there to pick up a little more and I thought to myself as I was looking at the fabrics "I thought I bought kinda a creamy white last time but I don't see anything creamy so I must not have."  And I bought the white.  I got it home and I was correct, my original fabric is creamy and my new fabric is white white.  See.
So I need to go back to the store but I have no desire to drag my 3 monkeys back to the store at the moment and I didn't want to make you wait any longer so here is my imperfect wreath.  When I go back I am going to buy more white white.

Total Time:
I kinda lost track of time between my chocolate think time and my having to return to the store but I would guestimate around 2 hrs.
Total Cost:
Wreath- $1.50
Fabric- about $3.00
You need about 1/3 yd of blue and 3/4 yd for both white and red.
So this wreath cost me a whopping $4.50.  You can't beat that.

Happy Crafting.  I will be back later this week for some tutu tips for you with the tutu drive.

Friday, June 25, 2010

Reward/Behavior Chart Ideas

Has your 3 year old ever scaled the front of the fridge to the top? Figured out how to reach her window locks, unlock them, kick out the screen, strip her clothes and sit on the window ledge butt-naked? Has your child ever grabbed on to a closing garage door only to hit the sensors and send the door back up while still holding on, taking a ride clear to the top?

I am not necessarily saying that I have, but I might know a thing or two about that...
So, I've decided it's high time for some type of behavior/reward chart. Something a little more formalized that can offer up a positive rather than a negative, and more importantly reinforce a good behavior. I have spent a GREAT deal of time thinking about behaviors and charts. I made a mini reward chart but I never put it into play, I wasn't convinced it was going to be even mildly effective. It was boring and too "charty." My piano students use a printout I gave them of a gumball machine. Each time they practice they color a gumball and for so many colored a prize! How fun would that be for my 3 year old?!? I thought awesome at first, until I realized she doesn't ever get gum and that she'd just ask for it if I gave this sheet to her. Back to the drawing board.... I've got it, she LOVES castles and princesses. So I grabbed some old scrapbooking paper and created a castle. The castle is several pieces. Each time for her reward she gets a piece of her princess castle to build on her wall. This way building the castle is a huge fun, reward itself. From time to time there she may find a princess sticker on her piece which would indicate a bonus prize from the prize stash. My prize stash consists of things like: cheap painting kits from the craft store, ring pops, balloons, just anything a 3 year old would want that's cheap.

Now for the behavior part.

I have selected 4 behaviors to emphasize on the next few weeks while building the castle. More than 4 things for a 3 year old is probably a little too controlling and not realistic for a 3 year old, keep it simple. After spending a few weeks on these four, I will select a some new ones. The behaviors this time round are:

-Complete a 30 minute quiet time
-Clean up bedroom
-Eat a meal well (this means no getting up, running around, and simply eating)
-Going to bed on time (this is a major disaster every night now that it's summer)

Here's some helpful links:
Good advice on making a reward chart
http://www.supernanny.co.uk/Advice/-/Parenting-Skills/The-Reward-Chart.aspx
Free printables
http://www.paintedgold.com/Organize/free-chore-chart.html
http://www.paintedgold.com/Kids/printable-reward-charts.html
http://kids.lovetoknow.com/wiki/Printable_Chore_Charts_for_Kids
http://www.chorecharts.com/Free_Chore_Charts.html
Great ideas (especially for an older child)
http://parentingtips365.com/2009/03/13/easy-and-creative-ideas-for-chore-or-reward-charts/

Here are some not-so fab pics of our castle.


Thursday, June 24, 2010

Tu-Tu Drive

I ran across this post that I think is brilliant and sweet and it might have made me cry.  Samsters Mommy is trying to gather 100+ tutu's to donate to a foundation called Princess Alexa Foundation.  This foundation started with a little girl who had terminal cancer,  She loved to dress up like princesses and was known as Princess Alexa.  Today the foundations donates dress ups and toys to children like Alexa.
To help you with this quest SamstersMommy is doing a tutu tutorial every Tuesday for the next few weeks.
Here is her first one.
Those are super cute tutus.
I also did a tutu many moons ago.  You can find that post here.
Next week I will also share with you some tips on ways to change this tutu.
Please visit Samsters Mommy to get details.  She is accepting any dress up for boys or girls.  But it must be new and never worn.
If you are participating send me a picture (e-mail me or become a facebook fan and upload it there) of your completed tutu so we can see how many came from us and I would love to see all that cuteness at once.

Monday, June 21, 2010

Cupcakes {frog and birds}

My middle monkey had a birthday party this weekend.  Because of that I wasn't able to review any crafts but I can show you these cute cupcakes I made and tell you how you can too.  First let me warn you, I am not a professional, nor have I ever taken any decorating classes.  I really want to take classes and I have hinted to my husband for years that signing me up for a class and watching our monkeys while I go would be a great gift, but it has never happened.
Anyways since the party was centered around animals I made animal cupcakes.  I was going to do a bunch of different animals but this project was slightly larger than I expected so I only made frogs and parrots. I also made faces of the birthday girls (there was another little girl whose b-day was the day after my daughter so we decided to combine their parties.)  Here is what they looked like.
I am pretty happy with them. I got the idea from ChicaandJo over here.   I wanted to do animals that we would have at the party though so I made my own templates.  I just searched through clip art for images I liked then I printed them off at a size to fit the cupcakes.  Here is the parrot image I used.
Simple lines was the key for me.  I then traced that image onto parchment paper so it wouldn't stick to my fondant. Speaking of fondant I am one who loves how it decorates but I hate how it taste so I decided to try my hand at making it homemade.  It tasted much better.  Here is the recipe.
After I drew the image onto the paper and cut it out  I traced the image onto my fondant with a food marker. (note the parrot was three separate tracings and I formed the beak by hand since it was to small to trace and cut out.)
I then used a sharp paring knife to cut the images out.
Now that looks really rough and messy I know but flip it over and use your fingers to smooth out the edges.
Much better right.    Now just use a LITTLE bit of water to glue pieces together, rather they be eyeballs or feathers.  Let it dry for awhile.  The more water you use the longer it will take to dry.  (Brilliant I know)  But it will take an hour at least.  And for your finishing touches use your food marker to add details.  Eyes, smiles etc.

See they turned out pretty cute right.  Well at least my 3 yr old loved them.  
 Happy Baking!
P.S.  Remember the ruffle dresses from last week, well here it a quick photo of them on my monkeys.

Tuesday, June 15, 2010

Happy Birthday To You

The lucky winner who can now celebrate all year long is...
Hollie Miller!!!
Congrats! I know you will love it.

Thank you everyone for your support.  Remember to keep checking for cute tutorials and giveaways.

Monday, June 14, 2010

Tutorial Monday {Ruffle Peasant Dress}

Today's review is absolutely  darling.  I can't believe how much I love this dress. This dress comes from
Ta Da! Creations.
Angel Has some beautiful tutorials that all make me ooh and ahh.  Everything she does is so professional and beautiful.  Here is a sampling of her beautiful creations.
Amazing isn't it.  She also has some recipes and organization tips and decorating room tips.  But today we are going to look at her Ruffle Peasant Dress.
They're gorgeous aren't they!  When I saw this I knew I had to make them for my little monkeys.  Here are my finished dresses.
I am so happy with them.  I think they are the cutest dresses I have ever made.

So I am having a hard time with how to review this tutorial.  I find myself wanting to do sewing lessons as I think about it, but I don't know what your sewing level is.  I still consider myself beginner to intermediate and I was able to make it just fine. So no sewing lessons today, but if you want extra tips don't hesitate to ask.  And if you want sewing lessons just let me know, I would be happy to do some.

The one thing that did take me a minute to figure out was how to pin the sleeves in so I did take a few extra pictures of that process for you. Keep in mind that the sleeve is part of the top of the dress it's not a typical sleeve that sewn onto the side of the top.
So here is the sleeve with the seem together and then turned right side out. Notice the top and bottom, it is flipped from my usual idea of top and bottom of a sleeve.
This is how it fits with the dress, just put it inside then pin and sew.  Hope that little extra helps.
 Also one other tip, the pattern went up to size 4, but One of my monkeys is 5 so I had to make my pattern slightly larger.  Here is how I did it.  This was by no means "scientific" and it only works with making a pattern slightly larger.  So while tracing the pattern I grabbed a fat washable marker.  I traced the right on the outside of the pattern.
When tracing a pattern I usually use colored pencils.
As you can see the marker makes a big, little difference. Then when I cut the dress out I just cut on the outside of the marker.  Also since this dress is already altered in length I was able to make it longer for her.
If you want to make some bigger than size 4, here is a pattern that might work.
Total Cost: About $13 per dress.
If you are familiar with designer fabric you will probably recognize that I used Amy Butler fabric for my dressed.  Now that fabric is a bit more expensive than your average fabric, but I think it is so worth it.  To help with the cost here is a little tip.  Now lean in close because I am going to whisper this 
and
Now this might not mean much to you so let me explain.  The first website I mentioned true to it's name has tons of fabric, and a lot of designer fabric.  Plus they have free shipping on all orders over $35.  The second website I mentioned is a coupon code website.  I can usually find a 30% off total order from there to spend.  This makes the fabric much more affordable.
Total Time: 2 days
Before you freak out at 2 days let me explain, I have 3 children and sewing does take some time.  So over the course of 2 days I was able to trace the pattern, cut it out and sew it (2 dresses that is), while continuing on with my motherly duties etc.  So this dress is really a quick one over all.
Other Tips:
1-When you sew the ruffle on I would first baste it on. (That means keep your long stitch on that you used to make your ruffle.)  I say this because this is the hardest part of the dress and if your ruffle takes a detour on its way down the dress or you accidentally sew the back of the dress, or get any puckers (none of which happened to me) it will be much easier to unpick and fix.  Then when you sew the ribbon on return your machine back to a normal stitch and that will also hold your ruffle down securely.
2-If your like me and don't own a serger, and you are doing the zig zag stitch to help it not unravel I also used a pair of pinking shears to trim up the seams so the seams aren't bulky.
If you have any other questions don't hesitate to ask.  If you make one I would love to see it.
Here are a few more photos of this beautiful dress to inspire you.


p.s. today is the last day to enter the happy birthday banner giveaway.  go here and do so if you haven't yet.

Thursday, June 10, 2010

Frogs

As I mentioned before my middle monkey has an upcoming birthday.  We have a fun little company coming that will bring frogs, and birds, and snakes etc.  I am personally stoked.  So it is time to get invites out.  They are so stinkin cute I had to share them with you.
Isn't that a cute frog.  Now watch what it does.
How fun is that!  I must admit the idea isn't mine, I read it while Googleing animal party ideas.  Alas I can't find the link again to show you.  But I can send you to the frog template I printed out here.  Super nice since I can't draw a stick figure.  It was the perfect size when it printed as well.
Gosh those frogs are cute!

Don't forget about the giveaway for the Happy Birthday Banner here.  You have till Monday to enter.

Monday, June 7, 2010

Tutorial Review {Happy Birthday Banner}

Disclaimer: In the near future one of my monkey's is having a birthday, so my next few reviews are going to be getting ready for that.

Now with that out of the way today's review comes from Somewhat Simple.  Stephanie is a very creative fun crafter who has tons of way cute and simple crafts.  She is very organized and even has an organization part of her blog (thank you I need it!)  She also has some very yummy recipes and tons of fun crafts for kids. Here is a peak at some of her crafts etc. that are on my to do list.
The exercise block cracks me up.  But today we are looking at her Happy Birthday Banner.
I think it is way cute and how nice to not have to deal with cheap paper ones that rip before you can put them up.
I decided that Robert Kaufmans Confections fabric would make a perfect Happy Birthday Banner. So here is what I bought.
Perfect isn't it.  You will need 1/4 of a yard of each of these and a 1/4 of a yard of the fabric you are spelling Happy Birthday with.
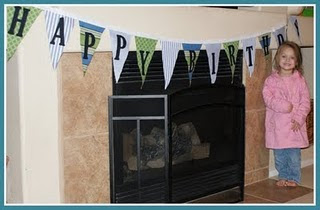
Here is what my finished product looks like.
I love it! (I know it doesn't look the best next to my orange wall but that was the only wall big enough to get a decent picture.) Here is just the "Birthday" part on a different wall so you can see the fun colors.
I love this and it was totally worth it.
Total Time: Around 2 hrs
Total Cost: $13
Helpful Tips:
1-REMEMBER TO TRACE YOUR LETTERS BACKWARD ONTO THE WONDER UNDER!
(nonchalant humming)
2-I traced my letters on the back of the paper to make it easier to trace onto the wonder under.
3-As I was cutting out my letters after ironing them to the black fabric it dawned on me that it would have been much faster to trace them all onto the wonder under, iron them onto the fabric than cut the letters out.  As opposed to trace and cut then iron and cut.
4- I made my triangles 8 inches in width and the point was 10 inches down.
5-My letters font size was 400.
6- I used exactly 1 pkg of bias tape. Well okay I admit not exactly I had 1 inch left over. 

Now for some good news.  I wasn't sure how much fabric I would need so I bought 1/2 yd of each.  As I mentioned earlier you only need a 1/4yd.  That means I had enough fabric to make 2.  Yes 2.  But what in the world do I need 2 for?  Nothing I can think of.  So I am going to give the second one to you (or maybe you, I don't know who yet.)   
Heres how to enter to win it for yourself.
1- Blog about it. Make sure to leave me a comment with a link to your blog.
2- Put my button on your blog.  Leave me a comment saying button with a link to your blog.
3- Become a follower and leave a comment saying follower (if you already are a follower just leave the comment it still counts!)
4- Become a fan of my facebook page here.  Leave a comment saying facebook.
Giveaway Deadline is Monday the 14th @ midnight.
Winners will be announced Tuesday morning.
This shouldn't be to painful to do, so Go, Fight, Win!

Tuesday, June 1, 2010

Tutorial Review {Lace Up Cards}

Today's review comes from Little Birdie Secrets. This craft blog has something for everyone.  It is three friends who have come together to share with us vast amount of knowledge and crafts.  Here is a glimpse of what you might find if you go over there.
See, something for everyone!  Since it was a holiday I weekend I went with a bit simpler, but wonderful craft this week.  Plus my little monkeys needed a new activity for church and other quiet times.  I also think I might whip up a few more sets to give as birthday presents.  Here is Little Birdie Secretes Lace Up Card.
Isn't that the cutest.  So simple and wonderful, and brilliant.  This is my finished project.
I love them.  I did do a little twist though. I decided to use cookie cutters to make my shapes.  This way I didn't have to scour clip art, or draw free hand. (If I had to draw free hand all my shapes would have been amoebas.) 

And I wanted them to be a bit sturdier so I doubled up the foam. 
The hole punch unfortunately will not fit around two layers of foam though so I had to punch one out.  Than to make my hole match up I laid the punched foam on top of the unpunched foam and placed a small dot in the middle.
I then centered the hole punch on the dot.  This method worked really well.  If I was more of a perfectionist I imagine it would have worked even better, but alas I am no where near a perfectionist.
In the end I think the doubled look ended up being super cute. And I am super pleased with the turn out.

To get my pieces of foam to stick together I tried spray glue, tacky glue and hot glue.  In the end they all worked, but the spray glue required a bit more work to hold them together at the beginning and the tacky glue required a lot of patience in drying, so my preferred glue was the hot glue.
Total Time: 1 hour for 6 cards
Total Cost: I bought a pack of 50 pieces of foam for $5.  The shoe laces were $2 and there were 4 laces in each package, so with a little math my total is around $0.60 for each card.
I just made them last night and they already came in super handy.  My eldest monkey had Kindergarten assessment today so I brought these along for my middle monkey to play with so she wouldn't get into everything, be a distraction to her sister or a stress to her mom.
She loved them! She sat there the whole time playing with them, and for this child sitting longer than 2 minutes is a huge accomplishment.