First off I never heard back from the winner of the baby Tu-Tu so I am calling a winner. The new winner is.....
Amanda!
Just e-mail me your address and I will get that in the mail. Congrats.
Our next item of business is a tutorial. Today's tutorial isn't really a review of any. I have seen this idea around a bunch and I wanted to try my hand at it. I didn't follow one specific tutorial, I read a bunch and decided on what I wanted to make and here is what I came up with.
I really like it. You can easily make this for any size as well. you could also make it a shirt instead of a dress if your heart so desires. It only took me about 1 1/2 hrs to make. So here is what I did.
1- Measure your child/the one who where will this dress. You need 3 measurements. First their chest, second under arm to the length you want the dress (or shirt) to be; and third, the top of where the dress will hit in front and in back. I got my third measurement after the main part of the dress was made so I could see easier where those areas are.
2- Cut your material. So my baby's chest measurement was 17 1/2. I doubled this plus 1 inch for seem allowance. The length was 13 inches, add 1 inch for hems. So I cut out a piece of material that was 35X14. If you are making this for a larger person whose chest is bigger than 22 you will need to cut out 2 pieces. (Most fabric is 45 inches wide so if the chest was 23 inches you would need to cut out a 47 inch piece which would be impossible so cut out two 23 1/2 inch pieces and sew together.)
3- Sew the side(s) together and hem both the top and the bottom of the material.
4- Shir top of the dress. Since this is my first attempt at shirring I am going to send you here for a tutorial on how to do that. Don't be daunted though it was a million times simpler than I thought it would be!
Depending on the age/size of who you are making this for will depend on how many rows you want to shir. I did 7 rows on this baby dress. Start just below your top hem and go to town. (This project is somewhat forgiving so don't stress if you aren't 100% perfect at it.)
5- After you have blasted it with an iron and made it shrink oh so nice and cute we will make the straps. This is when I tried the dress on my baby and measures from the front of the dress to the back of the dress to see how long my straps needed to be. I needed 6 inch straps so I doubled that plus an inch for hemming it and got 13 inch. So I cut 2 strips of 2inchesX13inches.
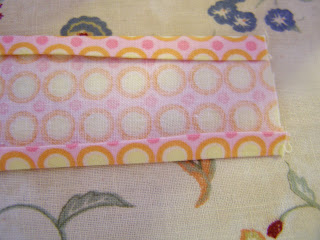
6- Iron and sew a narrow hem on both sides of the strips.
7- Turn your machines tension to the largest stitch size and go down the center of the strip. Make sure you leave a few inches of thread at either end of the strip.
8- Now grab 1 thread and gather your strap up to the size plus 1 inch of what you need your strap to be. I needed 6 inch straps so I gathered them up to be 7 inches long. Tie off the threads on both ends so your ruffle does not come undone.
9-Now turn your machine back to a regular stitch and sew straight over your ruffle stitch. This will prevent your ruffle from coming undone.
10- Hem both ends of the strap. Pin the strap to the dress to make sure you have it where you want in and sew it on. Voila your done.
And your baby is oh so happy because you can pay attention to her again.
Now I am a little crazy and when we go to church I like everyone to have sleeves on their dresses so I threw a cute onsie on underneath the dress for church and it is still super cute. (Don't you just want to kiss those cheeks!)
As always if anything is unclear, you need more pictures, directions or help in any way just let me know.


3 comments:
Ahhh so cute. I tried shirring for the first time a couple of weeks ago and now I'm obsessed! My little girl is so skinny her dresses swamp her so this is great for making them fit her waist. Thanks for sharing.
licklepickle.blogspot.com
I just finished my little girl's dress. Thanks so much for the tutorial!
http://creativityfinder.blogspot.com/2010/09/first-dress.html
I've been wanting to make some curtains by using a gathering stitch but couldn't figure out how to keep the gathering stitch from falling out.... never thought of going over it again.... duh and tying off, brilliant!!! I'll send you pics of the curtains when they are done, I'm making them out of the flat sheet to match the comforter!!! Just gotta finish the button holes on her dress first. One project at a time, lol!!!!
Post a Comment