Showing posts with label Food. Show all posts

Monday, August 31, 2015

Baked Oatmeal

I LOVE Baked Oatmeal.  I see recipes all over the place and I love trying new ones.  But when it comes down to it I have a favorite that nothing else has come close too.  The thing I love about this one is it is a good base that you can play around with, plus you can make it fit your families dietary needs. No gluten, dairy, processed sugar, and you can substitute the egg for a flax seed egg with no problem.  The best part is, it tastes like dessert:)
So here you go my Favorite Baked Oatmeal
2 c rolled oats
1/2 c chopped pecans 
1 tsp baking powder
2 tsp cinnamon
pinch of salt
1/2 c maple syrup ( the real stuff)
2 c almond milk
2 eggs slightly beaten
4 tblsp melted coconut oil
2 tsp vanilla
2-3 ripe bananas
2+ c fruit of choice (blueberries are our absolute favorite, in this one I mixed peaches and blackberries)

Preheat oven to 375
Grease a 9X13 pan
Thinly slice bananas to coat bottom of pan. Top with 1 cup of fruit.
Mix dry ingredients and pour into pan (Only include 1/2 of your nuts and save the rest for sprinkling on top.)
Mix wet ingredients and pour over dry.
Top with remaining fruit and nuts
Bake 35ish min.  And if you can let it cool for 10 min.  (We rarely can wait and just dive right in.)

Some other suggestions for your fruit includes:
apples chopped into smaller pieces (I bet some grated zucchini wouldn't be half bad in here either)
grated carrots and drained crushed pineapple
triple berry mix (frozen berries are just fine to use)
The possibilities are near endless, let me know what delicious combos you come up with.


Tuesday, May 26, 2015

Super Yummy and Super Healthy Granola

Hello blogging world again.  It's been a few years and while I am certainly busier than ever I find myself missing blogging and thinking about it frequently.  So Let give this a go again and to start off I am going to share one of my families favorite things.
           Homemade granola. It is packed full of yummy healthy ingredients and has no processed sugars in it.  We love it! Our favorite thing to do with it is add it to yogurt and fresh fruit.  You could certainly add some dried fruit and eat it as is or with some milk.  Dip french toast in it before you cook it (seriously if you have never tried granola on french toast you're missing out.)  And I love that this recipe is flexible to meet your families needs.
  Now quickly before I give you this AMAZING recipe let me update you on my family.  Last I talked to you I had just had my 4th baby and first baby boy.  That little boy is now 3 years old and has a little brother.  Yep 5 kids. This is us last year.  Super blessed.

Now for the good stuff.   
SUPER YUMMY HEALTHY GRANOLA

preheat oven to 325 and line two large pans with parchment paper

8 c rolled oats
1 1/2 c wheat germ
1 1/2 c oat bran
1 c sunflower seeds
1/2 c flax seed
3 c chopped nuts ( I do 1 c pecan, 1 c cashew and 1 c almond)
Mix all the above together in a large bowl
1 1/2 tsp salt
1/2 c maple syrup (the real stuff)
1 c honey
1 c coconut oil
1 Tblsp cinnamon
mix above in sauce pan. Bring to boil over med heat stirring frequently.  Take off heat and add 1 Tblsp vanilla.  Pour over dry and mix well.
Pour into prepared pans and bake for about 20 min (my oven cooks fast and it's closer to 17-18 min)
Stir about half way through..
After it's cooled you can add dry fruit if desired. Store in airtight container and enjoy.  

There you go I hope your family loves it as much as my family does.  If your family is gluten free I am sure you could do 3 c of oat bran instead of the wheat germ or  substitute ground flax seed and just leave out the 1/2 whole flax seed.

Tuesday, September 13, 2011

Chocolate Chip Cookies

I really do not think I am a braggy person, but if there is one thing I can brag about it is my Chocolate Chip Cookies.  I found this yummy recipe all the way back in high school and over the many years I have adjusted and tweaked the recipe to the point that this recipe is unbeatable.  And just because I love you I made some to share.
 Well okay I admit I only made them because I was craving them and the weather has finally started cooling so I don't mind turning on the oven so much, but hey if you feel like driving to the middle of a small town for a cookie I will be happy to share. 

 So to warn you this recipe makes a lot of cookies, and I have tried to half it, it doesn't work.  But don't worry your neighbors will love a plate... if you husband doesn't eat all the dough first.

So here you go:
1 lb butter room temp
2 c white sugar
2 c brown sugar
4 eggs
2 tsp vanilla
6 cups oatmeal
2 c red wheat flour
2 c white flour
2 tsp baking powder
1 tsp baking soda
1 tsp salt
1 bag of good quality semi sweet chocolate chips.

Cream butter and sugars together.  Add eggs and vanilla and mix.  Put oatmeal in blender until it is a flour. Add dry ingredients to butter/sugar cream.  Mix well. Add Chocolate Chips and mix.

Bake 375 for 8-10 min. 

Cookie baking tips:
-As with all cookies they should appear a little under done when you take them out of the oven.
-Also if they are coming out a bit flat refrigerate the dough for a bit.  If the butter is to warm to begin with the cookies will kinda melt, but if your butter if still kinda firm they will rise up good.
- The quality of chocolate chip you use really does make a big difference in how yummy your cookies will be.
- I started adding the whole wheat flour to try and add some more healthy grains to my life, but really it taste so much better.  The wheat flour gives it a very yummy nutty flavor.
- This recipe has killed a few hand mixers , if you have a kitchenaid or bosch use that with the cookie paddle.  If you don't have one mix the chocolate chips in by hand and really good muscles.


Enjoy!!! I was planning on eating that whole stack by myself, but as soon as I put my camera down my three children swooped in and prevented that.  I guess my hips thank them.

Tuesday, August 30, 2011

Packed School Lunch Ideas

One of the most stressful parts of sending my 1st grader to school was lunch.  The "school lunch people" and I don't exactly agree on what a healthy lunch is.  I have a hard time with jello being considered fruit and french fries being considered veggies.  And that is just the beginning.
So of course I made the decision to send my daughter with school lunch.  But that was another stress.  What in the world is there to pack besides a peanut butter sandwich?  So I have done some research and talked with a bunch of people and done some more research and I have even thrown a party for ideas.  I now feel like I have enough ideas to survive (although I am always up for another brilliant idea.)
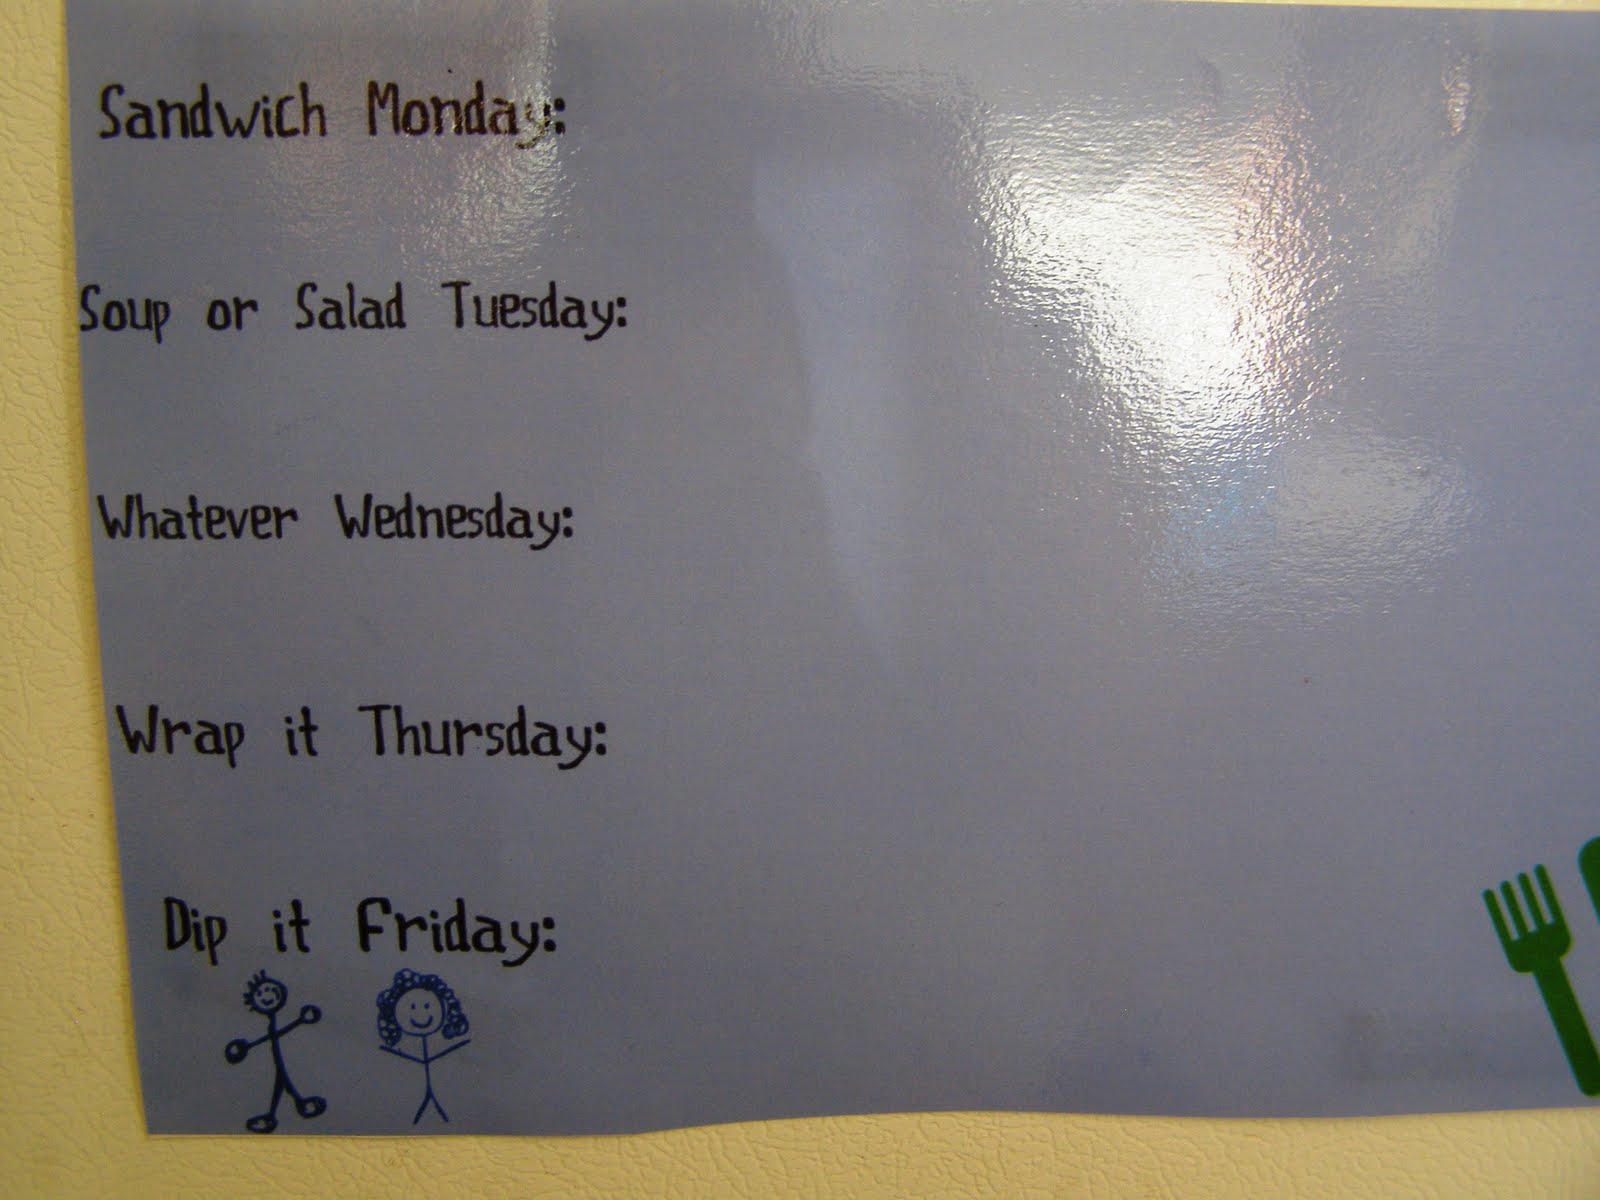
I then turned all those ideas into something tangible for my daughter and I to work with and placed it on the fridge.


So each day of the week is something different and fun.
After I printed this off I decided I should have names it wacky Wednesday instead of whatever Wednesday.  But it works.  I decided to have the whatever Wednesday because come Wednesday my brain needs a break.
 I also printed off a bunch of food ideas to go with each day.  I laminated everything and put magnet tape on the back.
So this jumbled list might not make sense to you so let me explain what is what.
Sandwich Monday:  This one is easy enough. Whatever type of sandwich your child will eat include it.  I have included peanut butter and honey/jelly, turkey, cucumber and sandwich on a stick.
My DD loves  cucumber sandwiches.  I just spread bread with some cream cheese and a little ranch mixed together and add cut up cucumbers.  She is as happy as a clam.  You also need to check out a sandwich on a stick.
Soup or Salad Tuesdays:   I do have a print off for green salad or pasta salad or just soup for this.  In the cooler months I make soup at least once a week (I LOVE SOUP!)  So I figure I will just send leftovers of whatever it may be in a thermos.  Some tips I have learned for keeping food warm in a thermos: Heat your food in the oven or on the stove NOT in the microwave.  Food will hold it's heat better when more naturally warmed.  Also before you fill your thermos with food fill it with boiling water so the thermos is already warm.
If your doing  a salad here are some fun or yummy tips.  You can make a salad on a stick (like the sandwich.) Also keep some breaded chicken in you freezer and cook it up the night before morning of whatever. Then that is a yummy protein to add to your child's salad.  (Mine like if I add this recipe to the chicken. I use a little less hot sauce though.)
Whatever Wednesday: Just what it says.  Repeat a lunch idea or do something else.  This might be a good day to send a home made lunch able or go to the school and eat lunch with your child.  Wednesday is also my kids early out day so sometimes it is fun to send a bowl of cold cereal and they can grab a milk from school for 25cents to top it off.  Then you can give them a more substantial snack when they get home.  Another idea is to cook some pasta the night before and after you drain it stir a little butter in.  The nest morning add some grated cheese and it will have enough flavor for your kids to enjoy.
Wrap it up Thursday:  Our favorite wrap is spread a tortilla with cream cheese, top completely with spinach, add shredded carrots and alfalfa sprouts then top it off with a couple slices of lunch meat. Roll it up and if desired sip it in ranch.  Really you can wrap up just about anything.  And remember that chicken we talked about earlier, it works great in wraps too!
Dip it Friday: This is the most exciting day to me, as it should be.  The point of this day is to dip your food in something yummy.  This past week I made a peanut butter dip and sent my DD carrots, celery, apple, bananas and graham crackers to dip in it.  She loved it. Peanut butter dip recipe: 1/2 c peanut butter, 4 oz soft cream cheese 1 tblsp honey and milk to desired consistency (about 1 tblsp.) Mix well and chill.
Also my girls love as a veggie dip for me to mix dry ranch powder with cottage cheese.  It is super yummy.  Then you can send veggies and crackers.  Or you could do a hummus, a fruit dip the possibilities are endless.
One other idea for this day, or it could be done on some of the other days as well is to make a pizzadilla (quesadilla pizza style) and send marinara to dip it in.  I though it would be fun to send a few different pizzadillas like mozzarella cheese with spinach and tomatoes or monetary jack cheese with olive and pepperoni.  Just wrap you pizzadillas in foil.

Now you might have noticed that with my magnets I do have school lunch up there, lets just say I am not perfect and some days I need a little help, so I am not banning school lunch completely:)

I hope you find some of these ideas helpful and yummy.  I am also always looking for more ideas so feel free to share.
Here are some links to great school lunch resources as well.  Here, here, here, here, and here.

One last thing, my preschooler started school today.  Isn't she cute!

Tuesday, August 9, 2011

Super Yummy Bean Dip

So in January we were invited over to my brother-in-laws house and he served us this bean dip that ever since I have had dreams about.  It is the perfect combination of creamy, beany, cheesy and spicy.  It was something that I had to get the recipe for (as did every one else attending.)
Today because I haven't gotten any sewing done I thought I would make it up to you by sharing this magnificent recipe with you. 
So here you go:
1 can of chili
1 8oz pkg cream cheese
1 c grated cheese
2 drops of hot sauce (or to taste)

Throw it all in a pan on med-low heat until it is all melted together. And VOILA! 
Pretty easy isn't it.
I really like to pair it with cottage cheese.  I think it balances out a bit of the heat.
Enjoy!  I know I sure did.

Tuesday, July 19, 2011

A Delicious Grilled Hamburger

It is that time of year where everything taste better off the grill.  Meat, veggies heck even some fruits right?  But one thing has never fully lived up to my expectations, hamburgers.  The meat tastes so, well, blah.  So my hubby and I did some research and developed a perfect and delicious hamburger. And here I am to share that with you.

We started off with 2 lbs of hamburger meat and we (he) pressed 4 cloves of garlic into the meat.  If you don't have a garlic press I suggest you buy one.  It is without a doubt one of my favorite kitchen tools.

Now grind a good amount of black pepper into the meat.  If you don't have a pepper grinder, well I suggest you get one.  There is a world of difference in fresh ground pepper and that *stuff* you shake out of a pepper shaker.  Also it is important to say here do not add salt to the meat.  If you must add salt add it to the finished patties immediately before grilling. (we don't add any)

Now one last ingredient to add in.  About 1/2 c of beef broth.  This helps make your patty nice and juicy.

That is all we are adding.  you really don't want to add to much to your patty.  Just enough to enhance flavors and give it some juice.
Now with your hands gently mix this all together.  Don't do to much or to hard, your want your meat to remain soft and light. This is why you use your hands instead of a spoon so you can control.

After it is all mixed up form your patties. There are a few things to keep in mind during this stage:
-  You need to be careful here and not pat them to much, again you want them to remain soft and light.
-The fattier your meat is the more your patty will shrink while cooking.
- So you have a delicate balance of getting your patty to the right size without over working it.  But don't worry you can do it.
Then you grill them up. About 5 min per side.  Of course at the very end you through some cheese on.
While my hubby was outside grilling I was inside preparing the toppings and adding one more fantastic touch.  I toasted the buns.  Just brush them with a little olive oil or melted butter then put them on the griddle.

Now you are ready to build a hamburger that is super duper yummy.
(okay I should have taken a pictures of my hubby's built burger not mine.  Mine is really plain but that is the way things are at the moment.)

But hey they are delicious.  Even my non-hamburger loving children gobbled it up.

Friday, July 8, 2011

Summer Strawberry Salad

No I have not disappeared or given up.  My computer gave up on me though and it took a bit longer than anticipated to get it working again.  Sorry :(
I love Strawberry Spinach Salad. But of coarse some of the things I love most about it are the naughty parts of the salad.  So I have made it a little less naughty and still ohhh so good.
So there are three parts here, 1- salad, 2-honey roasted almonds and 3- the dressing.  Let's get started with the recipe shall we. (The dressing needs to chill an hour, so even though I am listing it last, I would start with it.)
Salad:
5oz Spinach washed and chopped
1/2 head Romain lettuce chopped and washed
1 quart fresh strawberries washed and sliced
1/4-1/2 red onion chopped into larger pieces
1/2 cucumber peeled and chopped
1 cup peas washed and snapped
(I am not a bacon person, but if you are I am sure a few slices of bacon crumbled in would be good too.)
Toss everything together.
Honey Roasted Almonds:
2 c whole raw almonds
3 T evaporated cane juice (You can get this at a health food store.  It is very similar to white sugar but lass processed making it less bad for you.)
1/2 tsp sea salt
2 T honey
2 T water
2 t coconut oil (I love the hint of sweetness coconut oil brings and it is really pretty good for you too.)
Put your almonds on a baking sheet and put it in a cold oven.  Then turn your oven on to 350 and bake about 10-15 min (watch close you don't want them burnt.)  If you are making these as a snack leave them whole, if you are putting them in the salad, chop them up.
Mix your cane juice and salt in a bowl and set it to the side.
On the stove top mix your honey, water and oil.  Bring to boil over med heat.  Add almonds and stir until all the juice has been absorbed. (about 5 min) Take off heat and add your cane juice mix, stir until coated.
You really only need about 1/2 c of these to toss into the salad, but I am sure you can figure out what to do with the rest:)
Dressing:
2 T sesame seed
1 T poppy seed
1/3 c evaporated cane juice
1/2 c olive oil
1/4 c balsamic vinegar
1/4 tsp paprika
1/4 tsp Worcestershire sauce
1 T minced onion
Mix all ingredients in blender except the seeds.  Once things are well mixed add the seeds and "pulse" them a time or two to mix them in.  Chill 1 hr.
I like to serve the dressing on the side, that way each person can get exactly what you want.  If you like it heavy go for it, but I like it  a bit lighter.  If you are taking it to a picnic and you want it all mixed in, just add it slowly to be sure it doesn't get too heavy.

I hope you enjoy this as much as I do, because I could eat it all the time:)

Monday, June 20, 2011

Baby Shower Rattle Cookies

Do you remember the baby shower invites I did a little bit ago?  Well The baby shower has since come and gone. (That along with Fathers Day and Birthday Parties kept me away from the computer last week. Sorry.) But we used the bright beautiful colors on the invites in the rest of the stuff we did.  So today I am going to show you the dessert I made.  Cookie Pops or Baby Rattles whatever you want to call them.
I think they turned out so cute.  I just made a yummy sugar cookie recipe and divided it in half.  Into one half I added yellow food coloring and a little bit of lemon extract.  I glued those cookies together with a lemon butter cream frosting.
The other half I added pink food coloring.  I glued them together with a chocolate ganache.
When I made them I did not stand them up immediately.  I left them on a cookie sheet in the fridge until a little bit before the shower started.  This was gravity would have a hard time conquering them.
To serve and display them I covered a Styrofoam block with cute paper.  I could not find a glue that would adhere the paper to the Styrofoam unfortunately so I used little satin pins.
Of course the little bow around the stick gave them the final cuteness edge and I think everyone enjoyed them.  It was really a fast, simple, cute and perfect dessert for a baby shower.

Enjoy!

Wednesday, June 1, 2011

Ice Cream for Breakfast

Guess what.  Today is my birthday.  So to celebrate I decided we should have ice cream for breakfast.  Now before you think this is me confessing a naughty pleasure to celebrate I should clarify, this ice cream is healthy.  Super healthy and super yummy.  Healthy, yummy and easy to make.  I know you are thinking this is to good to be true but it's not.
So do you want a delicious healthy ice cream you can eat for breakfast and be the coolest mom on the block.  Well then here you go.
All you need is almond milk and frozen fruit.  The ratio I like is about 1:2. 
So I put in 1/2c of almond milk and 1 c of frozen fruit.  
Throw this into a food processor and blend it together.  C.heck it out and see if you want to alter the ratio at all.  Also give it a quick taste to see if you need to add some sweetener
With some fruits I have noticed I like to add 1/2tsp of agave, these would be blueberries and raspberries.
My favorite flavor thus far is strawberry banana.  1/2c strawberries and 1/2 banana. No sweetener needed.
I think next time I am going to try 1/2c peanut butter and 1/2c of chocolate chips. MMMmmmm
So there you go.  I hope you enjoy this healthy yummy treat.

Monday, May 2, 2011

A yummy recipe and some other stuff...

So I went to bed last night with 98 followers.  I was fully expecting to wake up to 100 followers today, but alas it is still at 98.  So I need 2 more, so go and refer someone quick.
Now I have a super yummy/simple recipe for you.  I have found this new blog called Simple, Healthy, Tasty and it is full of amazing recipes and amazing information as well.  I have made a few and enjoyed them all but this one has been my favorite.  It is for a non-dairy whipped cream that is healthy, natural and delicious!  Here is the link to her recipe.
I made it to top off an Apple Crisp I made and the coconut flavor made it FANTASTIC!
You can find coconut milk usually in the Asian section of your grocery store.  I put it in the freezer for about 10-15 min.  I used evaporated cane juice as my sweetener that I bought at a health food store.  They do have raw sugar at your regular grocery store that you can use as well  (I bet agave would work as well). It is yummy and defiantly worth it.

Now to change the subject again...  My eldest girl has had long beautiful blond hair for a long time and she loves it.  But after much thought and discussion (and brushing through tangles) she decided to do this...
(That is almost 12 inches)
And donate it to Locks of Love

She now looks like this and we all love it!

Tuesday, March 8, 2011

Orange Crepes

So for Mardi Gras today I decided I needed to cook a French dinner.  Well what yummier French item is there to cook beside crepes?  None that I can think of.  Typically when we have crepes we do them with assorted berries and berry syrups and fresh whipped cream.  Don't get me wrong I love them that way but I wanted something different and more special tonight.  I had the thought that an orange creme fraiche would be yummy in them, but I did not have any of the ingredients I needed so I had to make something up.  And lets say WOW!
So here is what I did.


Basic Crepe: (found from allrecipes.com)
2 eggs
1 c milk
2/3 c flour
1 pinch of salt
1 1/2 tsp oil
Put all ingredients in blender and blend until smooth.  Refrigerated for 1 hour.  Heat up medium skillet and brush with oil.  Pour 1/4c batter into pans and cook until brown, flip and cook.

Orange Cream Filling
1 c cream whipped
1 c plain yogurt
2 tsp sugar
1 tblsp concentrated orange juice
1/4tsp orange zest
Whip all ingredients together.
*Whoops I forgot to say chill this for at least 1/2 an hour.  Sorry.  But I promise good things will happen.

Orange Glaze
1/4 c butter
2/3 c sugar
1/3 c orange concentrate
Cook in saucepan until butter is melted and sugar is dissolved. Stir frequently.

Also whip up some fresh cream with a little sugar and vanilla to top it off.

To assemble place 1/4 c cream mix in crepe and roll up.  Drizzle with 2 tblsp glaze and top with a dollop and freshly whipped cream.
Enjoy!!!

Wednesday, March 2, 2011

Apple Muffins

So I have been really craving muffins.  But I decided I wanted to make something different than my typical blueberry of coffee cake muffins.  So I made apple muffins and boy oh boy was that the right decision to make.  They were fabulous!  So I found this recipe from allrecipes.com and changed it up to make it out of this world yummy.

So here is what I did. I started off with 1 1/2c shredded apple and 1 1/2c diced apple (I used golden delicious).  Then I tossed them both with a little sugar and cinnamon.  Set that aside for a minute now.
 Now mix your dry ingredients together.
2 c flour
1tsp baking powder
1/2 tsp baking soda
 1/2 tsp salt
 In a separate large bowl mix your wet ingredients together.
1/2 c white sugar
1/2 c brown sugar
1/2 c soft butter (margarine would work but you would compromise the yumminess of the muffin)
2 eggs
 Once you mixed that up add 1 heaping tsp of cinnamon and 1 1/4tsp vanilla.  (May I suggest if you own imitation vanilla throw it away immediately and go buy real vanilla.  It makes a world of difference.)
 Now throw in all your apple and mix.  Then throw in your dry ingredients and mix. I think next time I make these when I throw in my apples I will also throw in about 3/4c chopped pecans.
 Now spoon the batter into a well greased muffin pan.
 Now to add even more yumminess.  Make a strudel.
1tblsp melted butter
1/3 c brown sugar
1 tblsp flour
1/8+tsp cinnamon (I always go a little heavy on cinnamon)
(Next time I will increase the butter and add some oats to this as well I think)
 Now top off your muffins.
 Throw into a 375 degree oven and bake for 20 min.
Sorry I don't have a picture of a single muffin, I was to busy eating them and trying to get my kids to not eat too many of them.  But trust me, they are totally worth it!!!

Friday, February 25, 2011

FYI

I am taking a little break.  I need to get caught up with the rest of my life.  While I am on this break it would be a great time for you to tell me how wonderful I am and how much you miss me:)  So for the next few weeks there might be a few post but don't expect to much. 

I'll make it up to you by sharing with you the most amazingly yummy frosting recipe I discovered the other day.  It is a coconut butter cream and it has opened my eyes to a whole new world of butter cream.  So here is the link.  Just so you know the cupcake recipe was yummy, the filling I think I would change but the frosting rocked my world.  Enjoy!

Tuesday, February 22, 2011

Birthday Cake Disaster/Close Save

So my eldest monkey had her 6th birthday party a little bit ago.  She wanted a Tinkerbell birthday.  One of the most important parts of the party (if you ask me) is an awesome cake.  I pride myself on making cakes.  But this time everything went wrong.  So my plan was to make some 2 tiers and cover them with all sorts of flowers and then put Tinkerbell on the top.  Well I went to make my royal icing a few days before so I could make the flowers and get them out of the way, but I couldn't find my meringue powder.  So that had to wait.   So I didn't get to making my flowers until the morning of the party, and my royal icing ended up the consistency of marshmallow cream (how that happened I do not know.) So only one type of flower worked.  Then through that confusion I forgot to start making to frosting for the cake which needed to cool for 2 hours and I didn't have enough ingredients for the typical butter cream frosting, so I had to call my mom who was on her way to stop and grab canned frosting.  So as you can see this cake was turning out to be a disaster.  But somehow with the help of my mom we were able to come up with this.
So no it wasn't what I envisioned and I am not madly in love with it, but for everything that went wrong making it, I am happy.  And all the little girls at the party loved it so I guess that is what really matters. (And it was yummy:)
So the moral of the story is, don't give up! A disaster homemade cake is still better than a store bought cake:)

Tuesday, February 15, 2011

Happy Valentines (a day late.)

Yesterday I spent spoiling my family and friends that I love so I didn't have the time to share the love with you.  But don't worry here I am today.  First off my sweet monkey children wanted to say Happy Valentines to you.
 Ain't they cute in their Love t-shirts?
Second I wanted to show you the Valentines I made.  I got instructions for making the box here.
I used poster board because that is what I had on hand and I didn't take the time to cover the side strips with cute paper (it just wasn't worth my time.)  But I think they box turned out super cute!
 And it was filled with delicious things.
 I made all these chocolates and they are not things you would expect.
You see these first two are rice krispie treats.  I saw someone make a whole cute box of them and I loved the idea.  Unfortunately I can't remember where I saw it to share with you the full fledged creation.  But whoever you are thanks for the great idea.

 This one (that I wasn't patient enough with in setting) is just a heart shaped marshmallow.  The kids liked these one's, I could pass these ones up easily.
 This one was inspired by my favorite candy, chocolate covered cinnamon bears.  But I wanted a Valentine shape so it is chocolate covered cinnamon lips.
 And this last one ended up being my real favorite.  Again I saw the idea from someone else and now I can't find who you are, but I LOVE you!  I took a mini Reese's peanut butter cup and smooshed it between two pretzels then dipped them in chocolate.  It was heavenly delicious.
 I just had to show you this one little thing.  I bought the candy wrappers one day at a store thinking of this then another day and another store I bought the paper to wrap the box in.  It wasn't until I went to put them together that I made a near perfect match.  I was pretty happy with my subconscious self.
Anyways I hope you all had a great Valentines and I sure do love you too.
PS. If you happen to have seen those other tutorials for the rice krispie treat or the pretzel one let me know so I can link back to them  Thanks a million.

Monday, January 24, 2011

Chicken Enchiladas

I had originally planned another Dr. Suess baby shower post for today but I made these enchiladas last night that were soooo yummy I had to share them today.  I will do the other post later this week.  So anyways let me tell you about these enchiladas.  I have used the same recipe for years.  Don't get me wrong it is yummy, I was just getting tired of it and I felt like it needed an upgrade.  So last night I kinda winged it and gave it a fabulous upgrade. (again I am apologizing for the picture but I took the picture after most all the enchiladas were eaten up and... well the taste is a million times better.)
So here is the recipe:
Chicken Enchiladas
1 lb cooked chicken (I cook a bunch chicken in the crock pot with salsa and freeze it in 1 lb increments.  Just let in thaw out first)
1 can cream of chicken soup
1/3 c milk
2 garlic cloves finely chopped
1 tsp cumin
2 Tblsp fresh chopped cilantro
1 can black beans drained
(you could also add 1 can of corn drained)
1 c shredded cheese (I used colby jack b/c that is what I had on hand but if I had monteray jack I would have used that)
8-10 flour tortillas
½ c mild green enchilada sauce
2 c shredded cheese
Mix all ingredients up to the tortillas.  Spoon mixture into tortillas, roll them up and place in 9X13 pan.  Spread remaining mixture over top.  Pour enchilada sauce evenly over top and top with cheese.  Bake 350ยบ for 25 min.  

 I hope you enjoy this as much as my family did!