Now with that out of the way today's review comes from Somewhat Simple. Stephanie is a very creative fun crafter who has tons of way cute and simple crafts. She is very organized and even has an organization part of her blog (thank you I need it!) She also has some very yummy recipes and tons of fun crafts for kids. Here is a peak at some of her crafts etc. that are on my to do list.
The exercise block cracks me up. But today we are looking at her Happy Birthday Banner.
I think it is way cute and how nice to not have to deal with cheap paper ones that rip before you can put them up.
I decided that Robert Kaufmans Confections fabric would make a perfect Happy Birthday Banner. So here is what I bought.
Perfect isn't it. You will need 1/4 of a yard of each of these and a 1/4 of a yard of the fabric you are spelling Happy Birthday with.
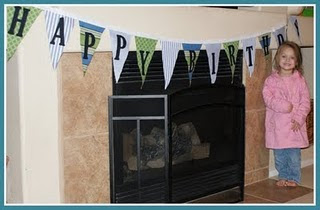
Here is what my finished product looks like.
I love it! (I know it doesn't look the best next to my orange wall but that was the only wall big enough to get a decent picture.) Here is just the "Birthday" part on a different wall so you can see the fun colors.
I love this and it was totally worth it.
Total Time: Around 2 hrs
Total Cost: $13
Helpful Tips:
1-REMEMBER TO TRACE YOUR LETTERS BACKWARD ONTO THE WONDER UNDER!
(nonchalant humming)
2-I traced my letters on the back of the paper to make it easier to trace onto the wonder under.
3-As I was cutting out my letters after ironing them to the black fabric it dawned on me that it would have been much faster to trace them all onto the wonder under, iron them onto the fabric than cut the letters out. As opposed to trace and cut then iron and cut.
4- I made my triangles 8 inches in width and the point was 10 inches down.
5-My letters font size was 400.
6- I used exactly 1 pkg of bias tape. Well okay I admit not exactly I had 1 inch left over.
Now for some good news. I wasn't sure how much fabric I would need so I bought 1/2 yd of each. As I mentioned earlier you only need a 1/4yd. That means I had enough fabric to make 2. Yes 2. But what in the world do I need 2 for? Nothing I can think of. So I am going to give the second one to you (or maybe you, I don't know who yet.)
Heres how to enter to win it for yourself.
1- Blog about it. Make sure to leave me a comment with a link to your blog.
2- Put my button on your blog. Leave me a comment saying button with a link to your blog.
3- Become a follower and leave a comment saying follower (if you already are a follower just leave the comment it still counts!)
4- Become a fan of my facebook page here. Leave a comment saying facebook.
Giveaway Deadline is Monday the 14th @ midnight.
Winners will be announced Tuesday morning.
Winners will be announced Tuesday morning.
This shouldn't be to painful to do, so Go, Fight, Win!


Yours is SOOOO cute! I love it!!!
ReplyDeleteThanks Steph I am happy with it.
ReplyDeleteThis is so cute!!! Thanks for all of your wonderful ideas. I'm not as crafty as you but I have a few birthdays coming up in my family so I'm entering your drawing from facebook.
ReplyDeleteLooks good Liz! That would be handy to throw up every party. We need to get mom one!
ReplyDeleteCody
I think it is fun...great to have for every Bday. You should make mom one!!!
ReplyDeleteCody
I said i wasn't going to enter, but why not :). This time i'll only enter in twice. Ive seen this and its super cute! Go cupcakes! :) i can't wait to see whats next.
ReplyDeleteLove it!! I got your button on my blog now - www.joyinthemaez.blogspot.com
ReplyDeleteI already follow you on facebook - such cute ideas
ReplyDeleteI am now an official follower on your blog! Where do you get such cute flowers for your flower bows?? I just love that big pink spikey one!
ReplyDeleteFacebook!
ReplyDeletei FOLLOW on facebook!
ReplyDeleteEnter me!
ReplyDeleteAmy J.
face book
ReplyDelete